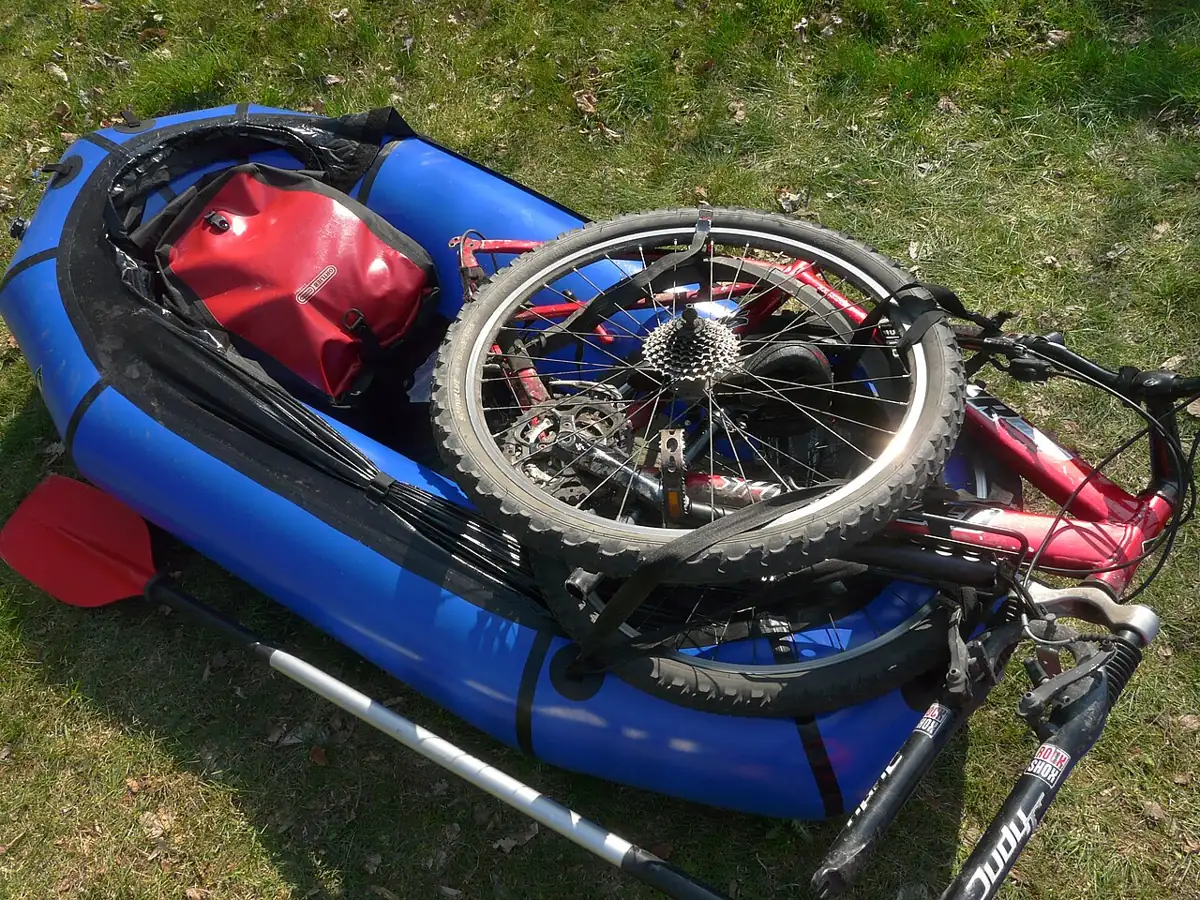
Gear · bikerafting
Bikerafting setup
With a bike and a packraft you can link trails and rivers into loops. Most of the work is building a stable load that cannot cut the boat.
Last checked November 2026
Bikerafting means riding to the water, strapping the bike to the packraft, paddling, and riding on. It makes loop routes and lake crossings possible, but a bike is a heavy load with sharp edges for a light boat, so take time over the setup.
On a map, a river that would normally need a car shuttle becomes a loop: ride the road or trail up, float back down. A lake that blocks a bikepacking route becomes a shortcut. Bikes and packrafts also let you reach put-ins that are too far to walk to with a boat on your back. You end up carrying the boat on the bike and the bike on the boat, and both have to come through the trip undamaged.
The boat
Most bikerafters choose a larger boat with a long bow, or a boat with plenty of D-rings or tie-down points at the front. A bigger boat carries the bike higher out of the water and keeps the bow from plowing. Ultralight lake boats can carry a bike on flat water but have little margin. See packraft sizing for how length and tube diameter affect load capacity.
Other features that help:
- A tough floor and tube fabric, since the bike, pedals and chainring will rub on them. The guide to packraft fabrics and construction explains the trade-off between heavier denier and weight.
- A cargo zipper, which lets you store soft gear inside the tubes and keep it low. That frees the bow for the bike. The page on cargo zippers covers how they work and how to look after them.
- Four or more bow attachment points, spaced so straps can cross over the frame rather than running in parallel.
- A spray deck is optional. Some bikerafters use one on cold or windy crossings, but it complicates loading and exits.
Prepare the bike
A rigid or hardtail frame with a simple drivetrain is the easiest. Full-suspension bikes are heavier and have more awkward shapes and pivot points to protect. Wide plus tires and fat-bike wheels are bulky but can be strapped flat on the bow.
Before the trip:
- Test whether your boat's bow points line up with the frame. Lay the bike on the inflated boat at home and work out strap positions.
- Fit quick-release or easy thru-axle levers so wheel removal is fast with cold hands.
- Make or buy padded covers for the chainring, brake rotors and rear derailleur. Old foam pipe insulation, a cut-up sleeping pad or a spare jacket all work.
- Practice removing and refitting both wheels, including the rear wheel and chain, until it takes a couple of minutes.
- Pick up a few extra straps with cam buckles. Ratchet straps are too easy to overtighten and can damage tubes.
- Weigh your loaded bike and kit so you know what the boat will carry.
On the bike: carrying the raft
Rolled tightly, a packraft fits on a handlebar harness or in a large seat bag. Paddle sections slide into a frame bag or strap along the top tube or fork. Your PFD can lash under the raft. Keep weight low and centered for handling on rough trails, and make sure nothing can rub through the boat fabric on the ride.
Roll the boat around something soft rather than around the paddle shafts, and keep metal buckles on the outside of the roll. A handlebar roll that's too long brushes the front tire or blocks your brake levers, so roll to fit your bars. If you use an inflation bag it can double as the outer stuff sack for the raft, which saves a few ounces and a bit of rubbing.
On the boat: carrying the bike
- Inflate the boat fully and top off firmly. A soft bow sags under a bike.
- Remove the front wheel, or both wheels if your bike and boat allow it. This lowers the bike and shortens the load.
- Shift to the smallest rear sprocket and pad the chainring, rotors and derailleur with a jacket or foam sleeve.
- Lay a pad or spare clothing on the bow where the frame will rest.
- Lay the bike across or along the bow, drive side up, so the chainring is away from the fabric.
- Strap the frame to the D-rings with at least two straps, then strap the wheels on top or against the frame.
- Check that nothing touches the water or hangs over the side where it could catch.
- Paddle a short test loop in calm water before committing to a crossing.
Crosswise or lengthwise?
| Bike orientation | Advantages | Drawbacks |
|---|---|---|
| Across the bow | Lower center of gravity, compact load, good visibility over the bars | Handlebars or wheels can stick out to the side and catch water or branches |
| Along the bow | Narrow profile, nothing hanging off the sides | Higher, more wind-catching, can block forward view |
| Wheels off, frame flat on top | Lowest and most stable | Takes longest to set up and tear down |
Most people settle on frame across the bow with wheels stacked on top or against it, because that keeps the load low and short. Experiment on calm water near the car before you need it on a real crossing.
Balance and handling
With a bike on the bow the boat sits nose-down and turns slowly. Sit a little farther back, and if you carry a pack, place it behind you or inside the tubes to balance the bike. A tall load catches wind like a sail. On open water, wind and waves are the main risk; cross early in the day when water is calm and stay close to shore.
Weight distribution
A well-trimmed boat sits close to level. If the bow buries in small waves, shift soft bags behind you, move the bike back a few inches, or top off the bow tube. If the stern drags and the bow catches every gust, you have too much weight behind you. You'll feel a nose-heavy boat within a few strokes: it keeps spinning off line and you spend every stroke correcting.
On cold water a swim is worse still. A swim from a loaded boat in the middle of a lake means swimming a heavy, awkward boat to shore. Read the cold-water safety guide before any crossing on snowmelt lakes or rivers, and dress for the water, not the air. If you do run moving water with the bike aboard, wear a helmet made for paddling or at least keep your bike helmet on.
Protecting the boat
Sharp parts cause most bikerafting damage: chainrings, brake rotors, pedals and derailleur hangers. Pad everything that touches the boat and check for wear after each crossing. Carry repair tape and patches; see the repair guide for field patching.
Also watch for grit. Sand and dirt from the tires grind into the bow fabric under the frame. Rinse the wheels or brush off the worst of it before loading, and put a sit pad or folded jacket under contact points.
Common mistakes
- Loading the bike on a soft boat, so the bow sags and plows water.
- Leaving pedals on and unpadded, then finding a hole after the first crossing.
- Using too few straps, so the bike shifts in waves and rubs the tubes.
- Stacking everything high on the bow, making the boat tippy and wind-prone.
- Starting a long crossing in the afternoon when the wind picks up.
- Skipping the test paddle, then discovering the trim is wrong halfway across.
Packing light enough
With a boat on the bike, the rest of your kit has to shrink. The packing list shows what to keep, and the dry bags page covers how to stow gear so it survives a swim. For more trip ideas, see what you can do with a packraft. The gear overview has everything else.
Mild, flat rivers make the best first bikerafting trips. Colorado's Ruby and Horsethief canyons are a well-known flat stretch of the Colorado River where you can practice loading and paddling a bike without rapids to worry about.
FAQ
Can any packraft carry a bike?
Many can on flat water, but larger boats with a long bow and multiple tie-down points carry a bike far more safely. Check the maker's load guidance for your boat.
Do I have to take the wheels off?
Usually at least the front wheel. It lowers the load and makes it more compact. Taking both off is the most stable option.
How do I stop the chainring from cutting the boat?
Shift to keep the chain on the smallest rear cog, cover the chainring with foam or clothing, and load the bike drive side up so the chainring points away from the fabric.
Is bikerafting safe on whitewater?
Loaded whitewater is risky. Most bikerafters stick to flat water and easy rivers with a bike aboard, and portage or unload for rapids.
What straps work best?
Cam-buckle straps of different lengths. They are easy to adjust and less likely to be overtightened than ratchet straps.